“Rorschach’s Journal: April 1st, 2017. How I Created My Rorschach Cosplay- No Foolin’.”
“None of you seem to understand. I’m not locked in here with you. You’re locked in here with ME!” – Rorschach
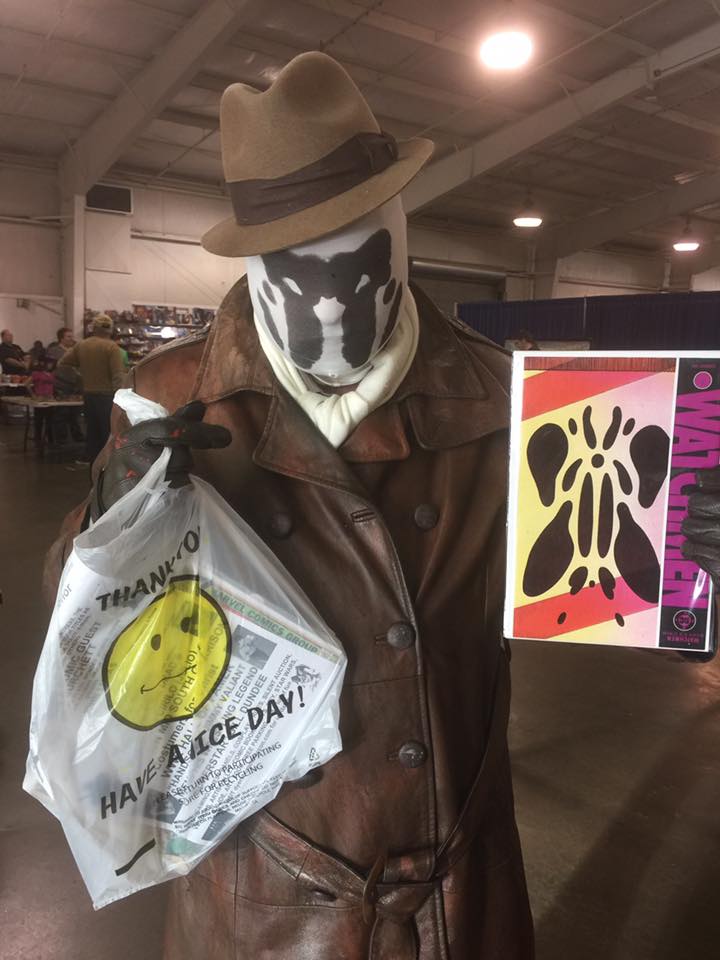
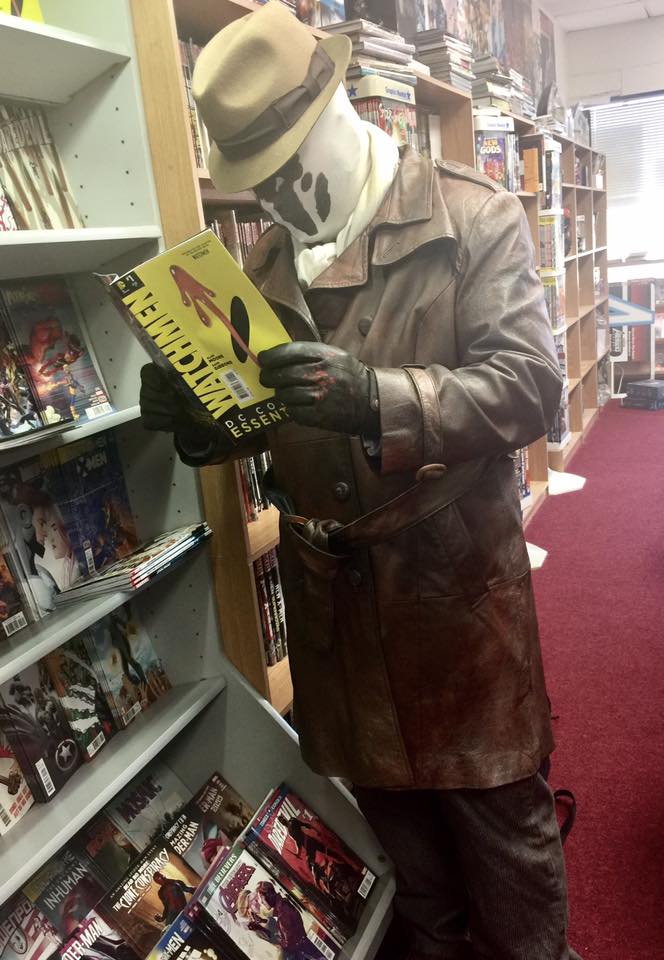
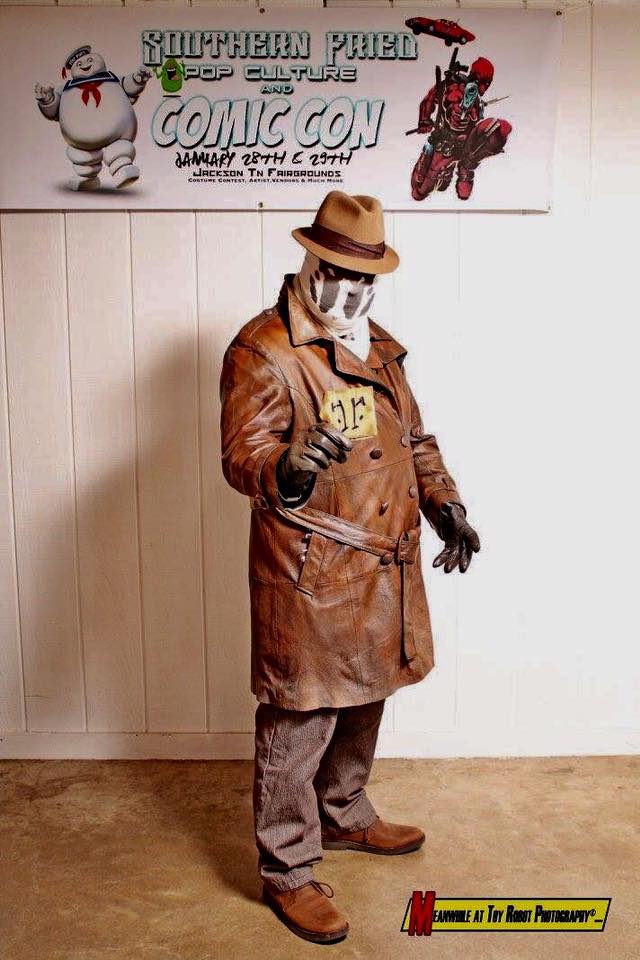
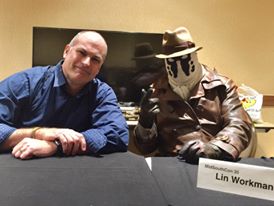
I’ve been working on my Rorschach costume for several months now, and finally got to put my new face on and go out in public this past weekend to MidSouthCon (after a couple trial runs at Memphis Comic Expo and Southern Fried Comic Con). Thankfully the Memphis weather was good for the show, and many folks knew who I was supposed to be. Since I’ve posted progression shots of the costume creation on my Facebook page a lot of people knew who was under the mask, too.
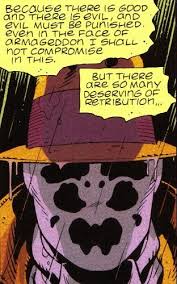
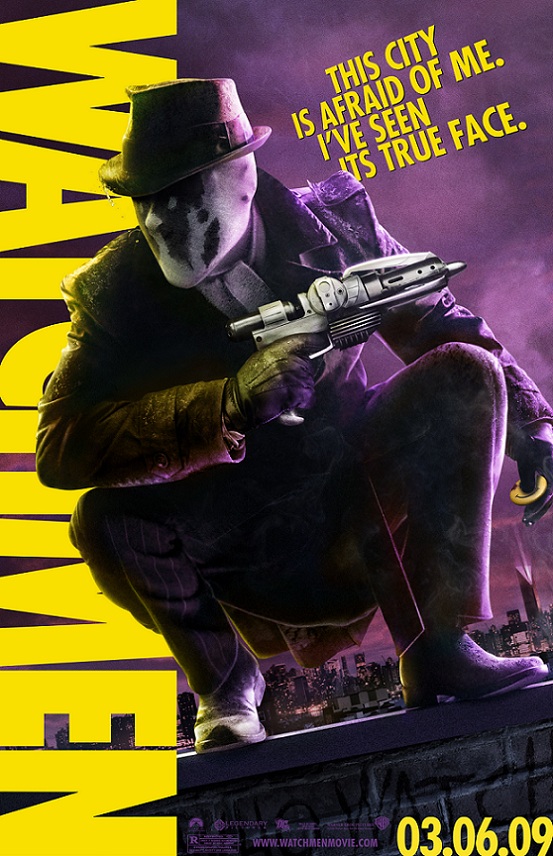
Rorschach is a character with a black and white view of good and evil in the world. He first appeared in the 12 issue comic series “Watchmen” in 1986-1987 by writer Alan Moore, artist Dave Gibbons, and colorist John Higgins (and editors Len Wein and Barbara Kesel). A film adaption was done by director Zack Snyder in 2009. Before Watchmen, a comic-book series prequel to the original Watchmen series was released in 2012. A video game and a motion comic were also released.

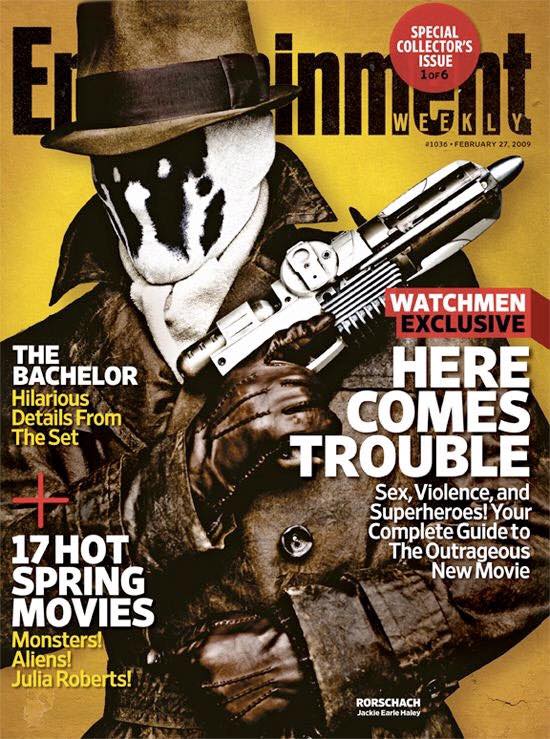
I wanted to do a cross between the Dave Gibbons comic version, and the Zack Snyder movie version (played by actor Jackie Earle Haley). I like aspects of both, but wanted to be free enough to create my own version of the character and not be tied to making an exact duplicate of either.

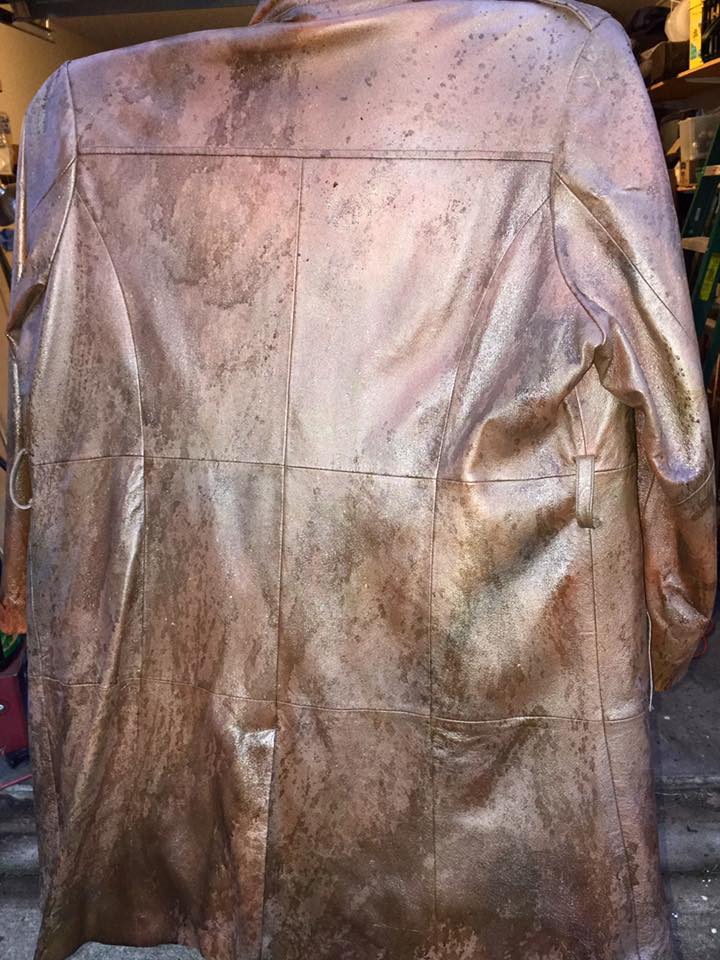
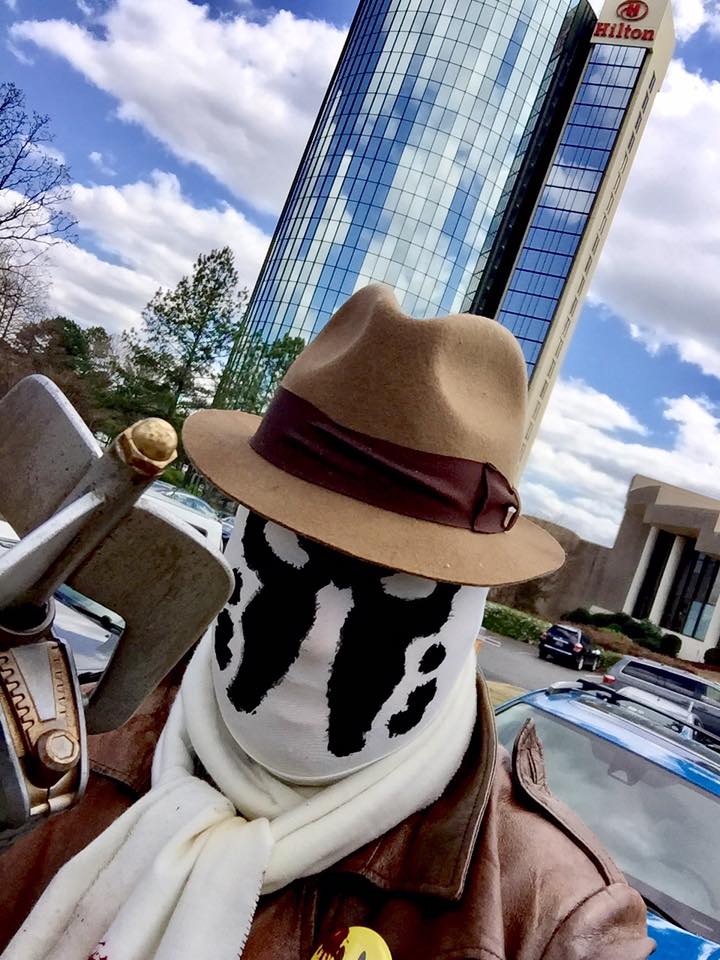
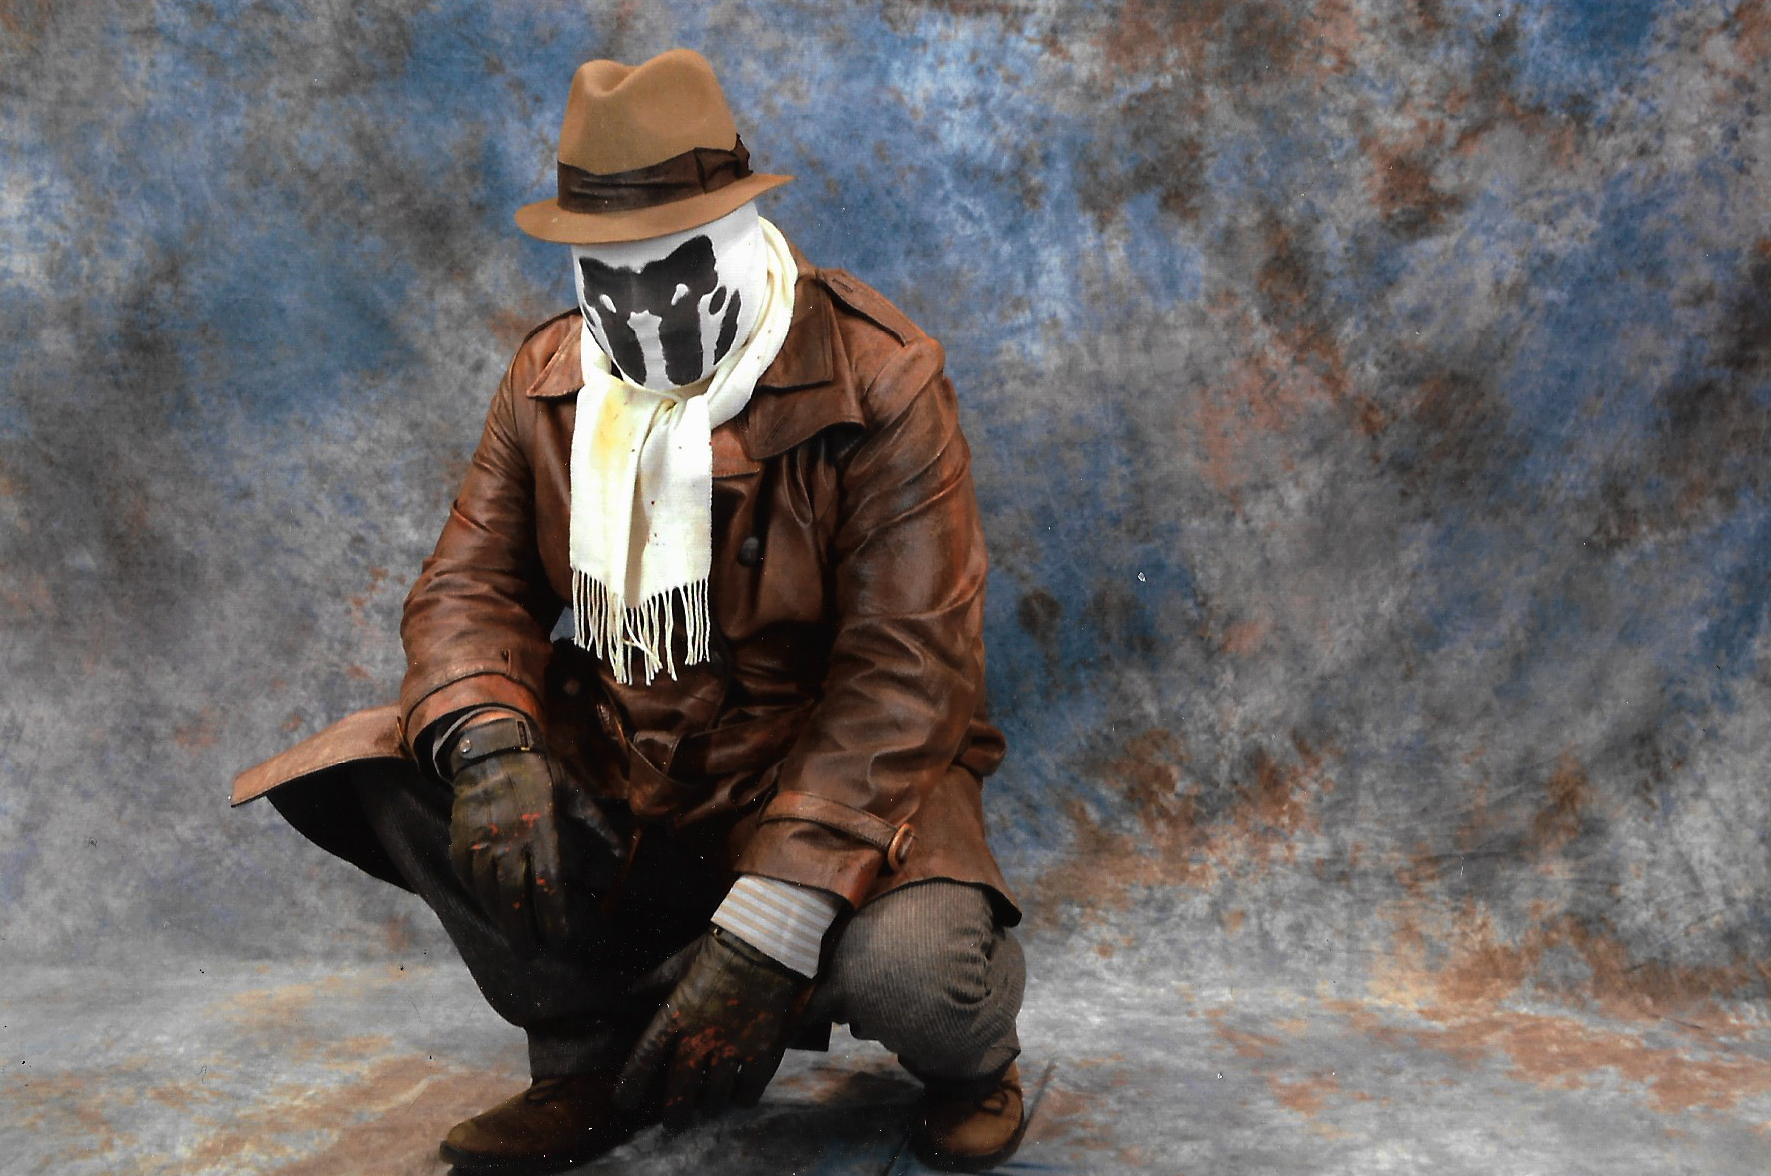
I’ve taken pieces from my Doctor Who War Doctor costume (leather jacket and shirt), added new items, and fabricated a few. The coat started off as a black leather jacket from Goodwill that cost me less than $30.00. I cleaned it with rubbing alcohol, airbrushed it brown with Createx airbrush acrylics, and used some splatter and wood stain wash to age it (I’ll do a blog on the War Doctor costume soon). I also replaced all the buttons. For the War Doctor I don’t use the belt or buckled wrist strap pieces, but I do on Rorschach (and will on a future Det. Jim Gordon cosplay). I unbuttoned one epaulet and put a little wire inside it to help make it stand up a bit.
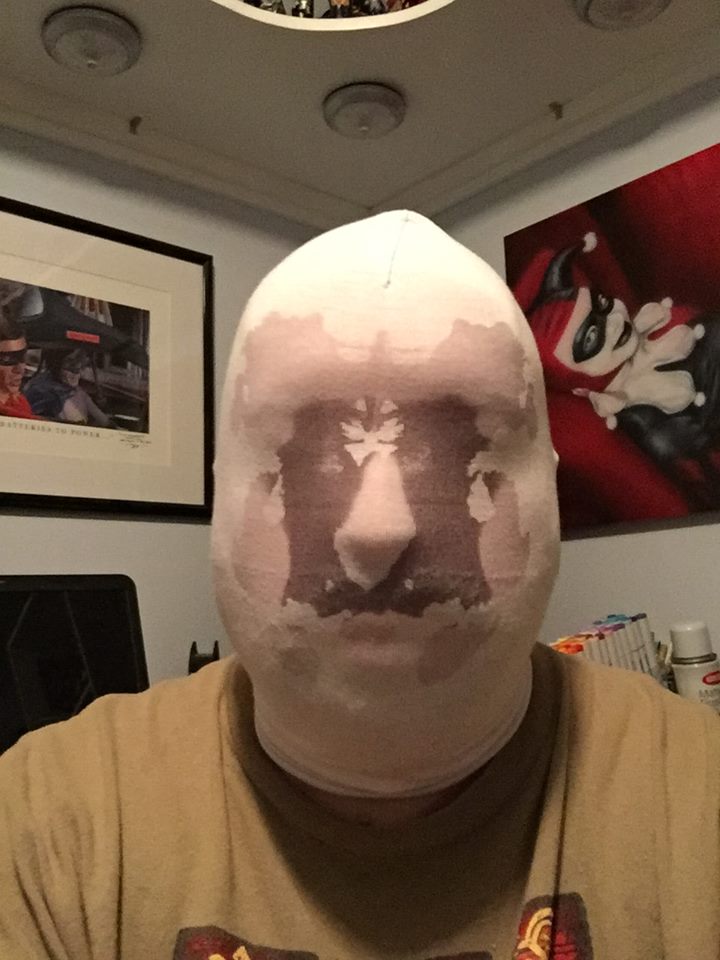
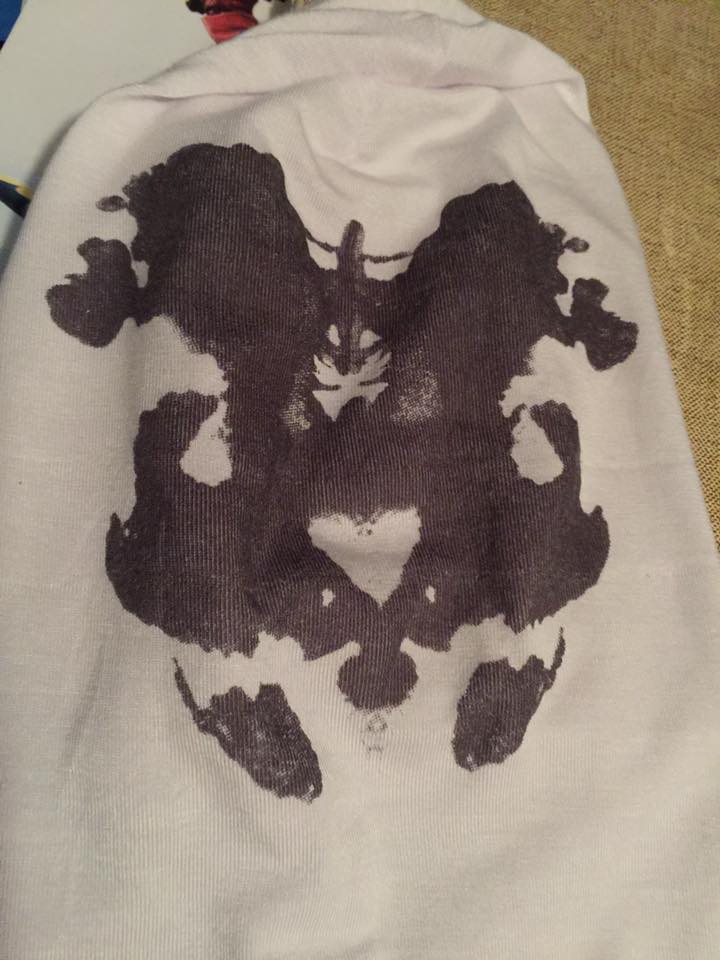
I needed a new mask. I had two others I bought from eBay– a static pattern mask, and one that does change with heat/cold, but it really only works well in 50-60 degree temps- and even with a plastic under-mask it wasn’t as dramatic as I had hoped. Both were a bit difficult to see out of and the patterns were a bit lighter than I liked, and the stitching on one was already coming loose. I plan on making a new shape-changing one in the future, but will wait until it cools off again. You can use Speedball Fabric/Acrylic Transparent Base clear gel ($8.00/8oz) and black Thermochromatic Pigment powder ($18.00/20g)to create the effect. I’ve seen them both for sale on Amazon. The powder and gel aren’t too pricey, and if you plan on making a few different masks it could well justify the cost.

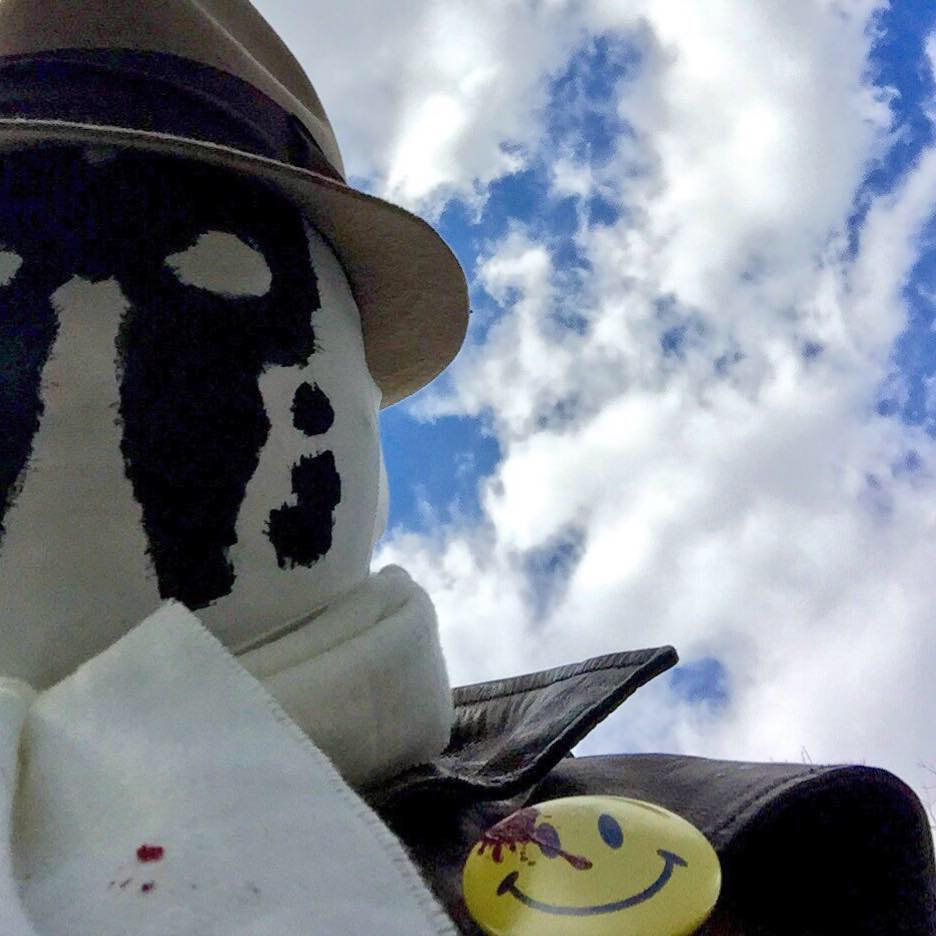
For now I just needed a good static design mask. I bought a blank white Morphsuits mask off of Amazon ($12.00) and painted it myself with acrylic black after stretching it over a Styrofoam wig head. I first put the mask on and had my wife sketch small ovals where my eyes were before sketching the pattern in pencil and then painting it. The darker black areas helped to cut down on the glare- kind of like the black a football player might wear under their eyes. Bringing the brim of my hat down a bit more helped shade my eyes and allowed me to see better as well. I was actually surprised at how well I could move around the con on my own in this newer version of my mask.
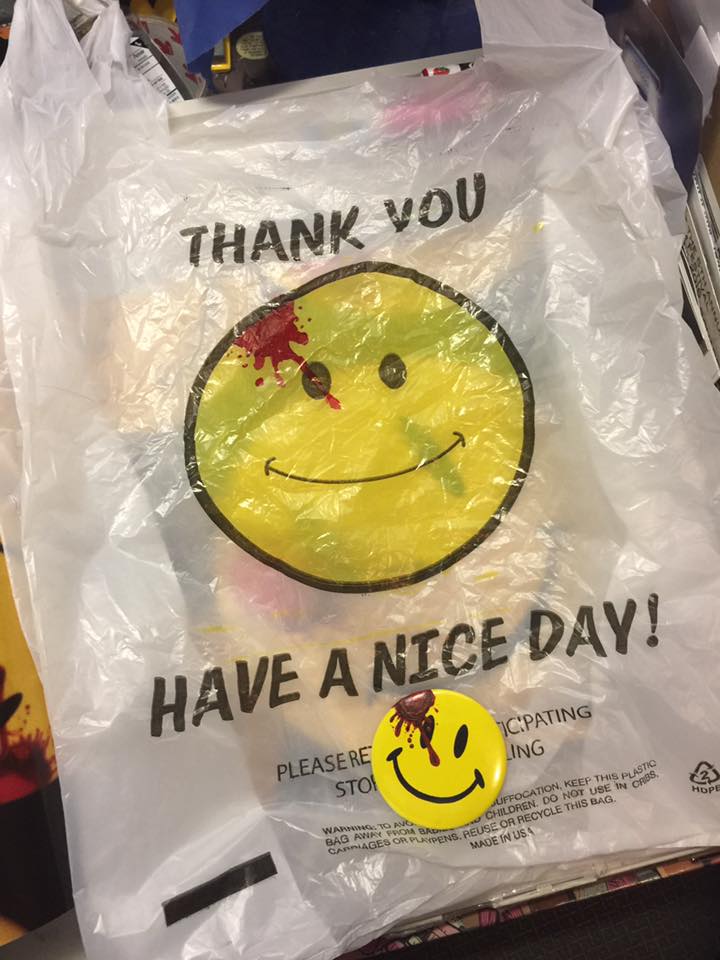
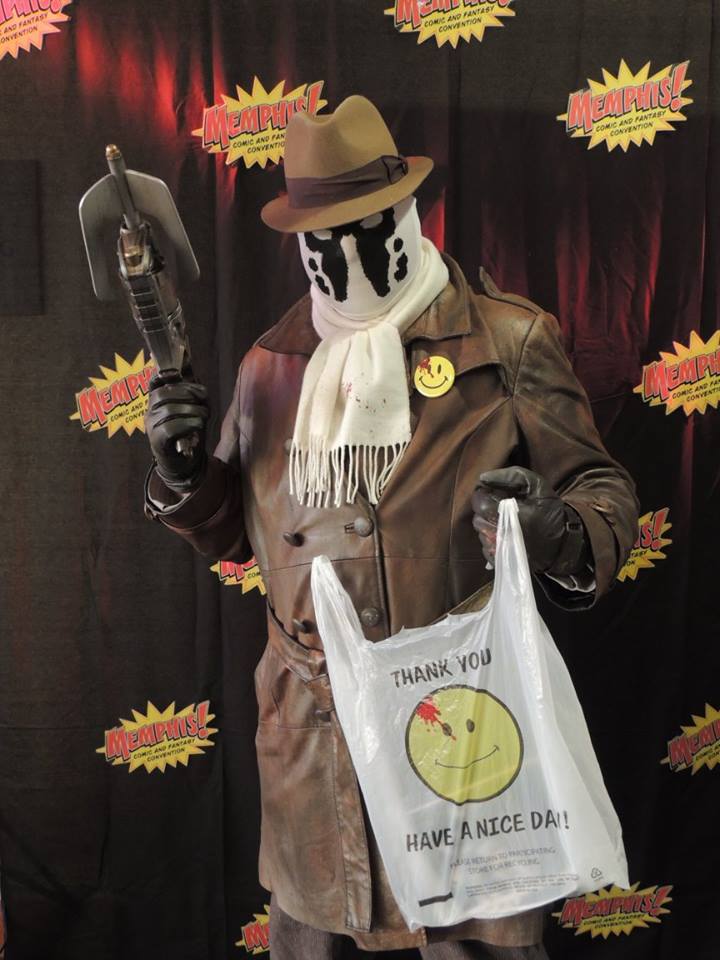
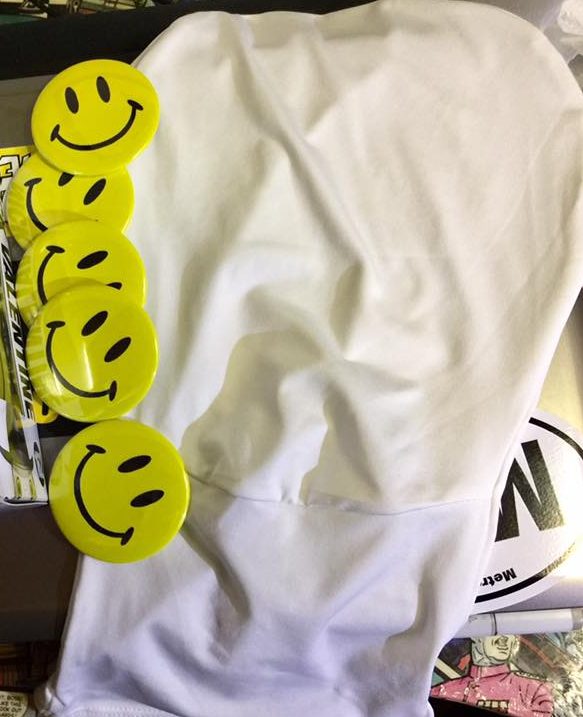
Oh, I have been saving any smiley face bags I get- our local Chinese restaurant has them for take-out. I even got one at the Southern Fried Comic Con in Jackson, TN while dressed as Rorschach. I’ve painted them with Copic markers to take to cons with me to hold stuff like my program or props like my cardboard Rorschach logo. I was going to order a Comedian smiley face button off of Amazon, but found 5 plain 2″ ones for about the same price as one pre-made logo button (less than $10.00 w/shipping). Now I have extras and they look a lot more realistic painted with acrylics. I pushed the paint around to build up the edges a little and make the top a bit thinner to give it more of a 3D effect, and used red, brown, and purple to give it a dried blood splatter look. Clear coated it to protect it.
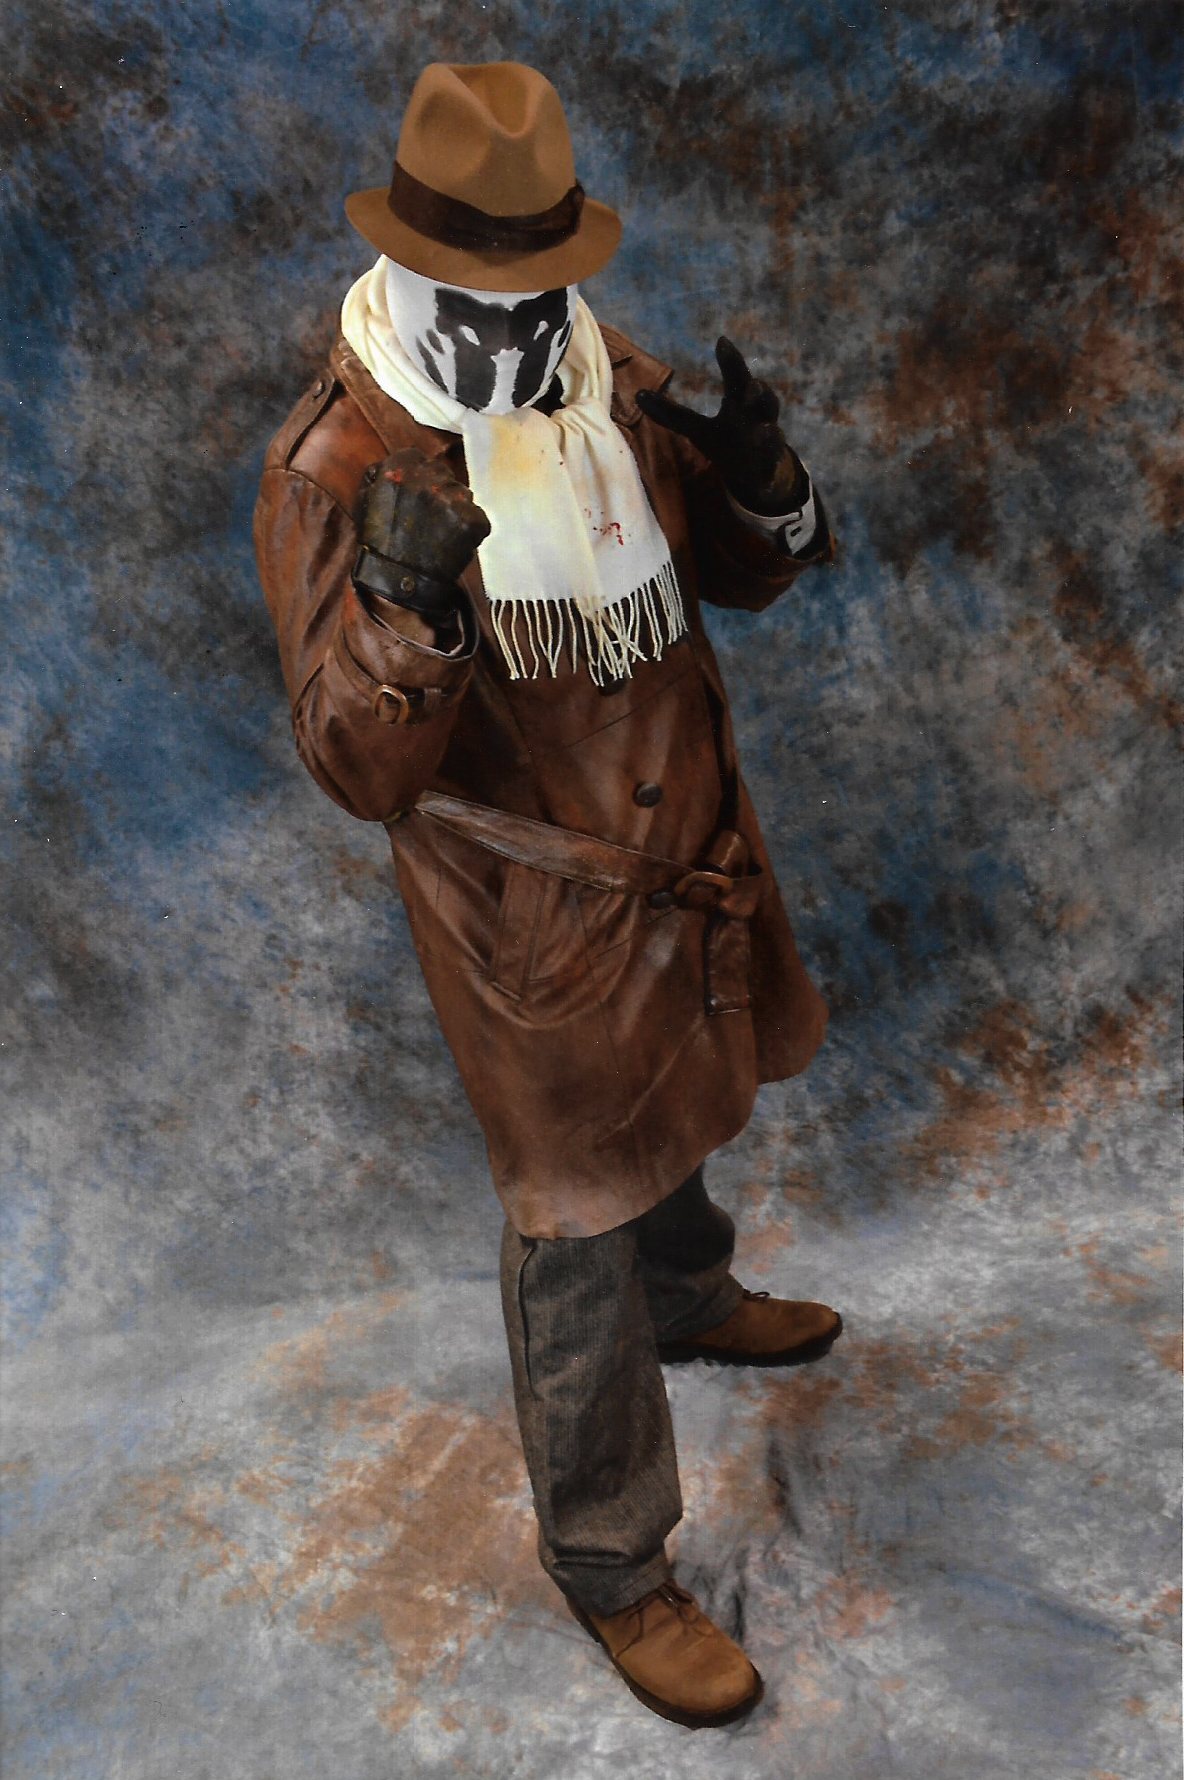
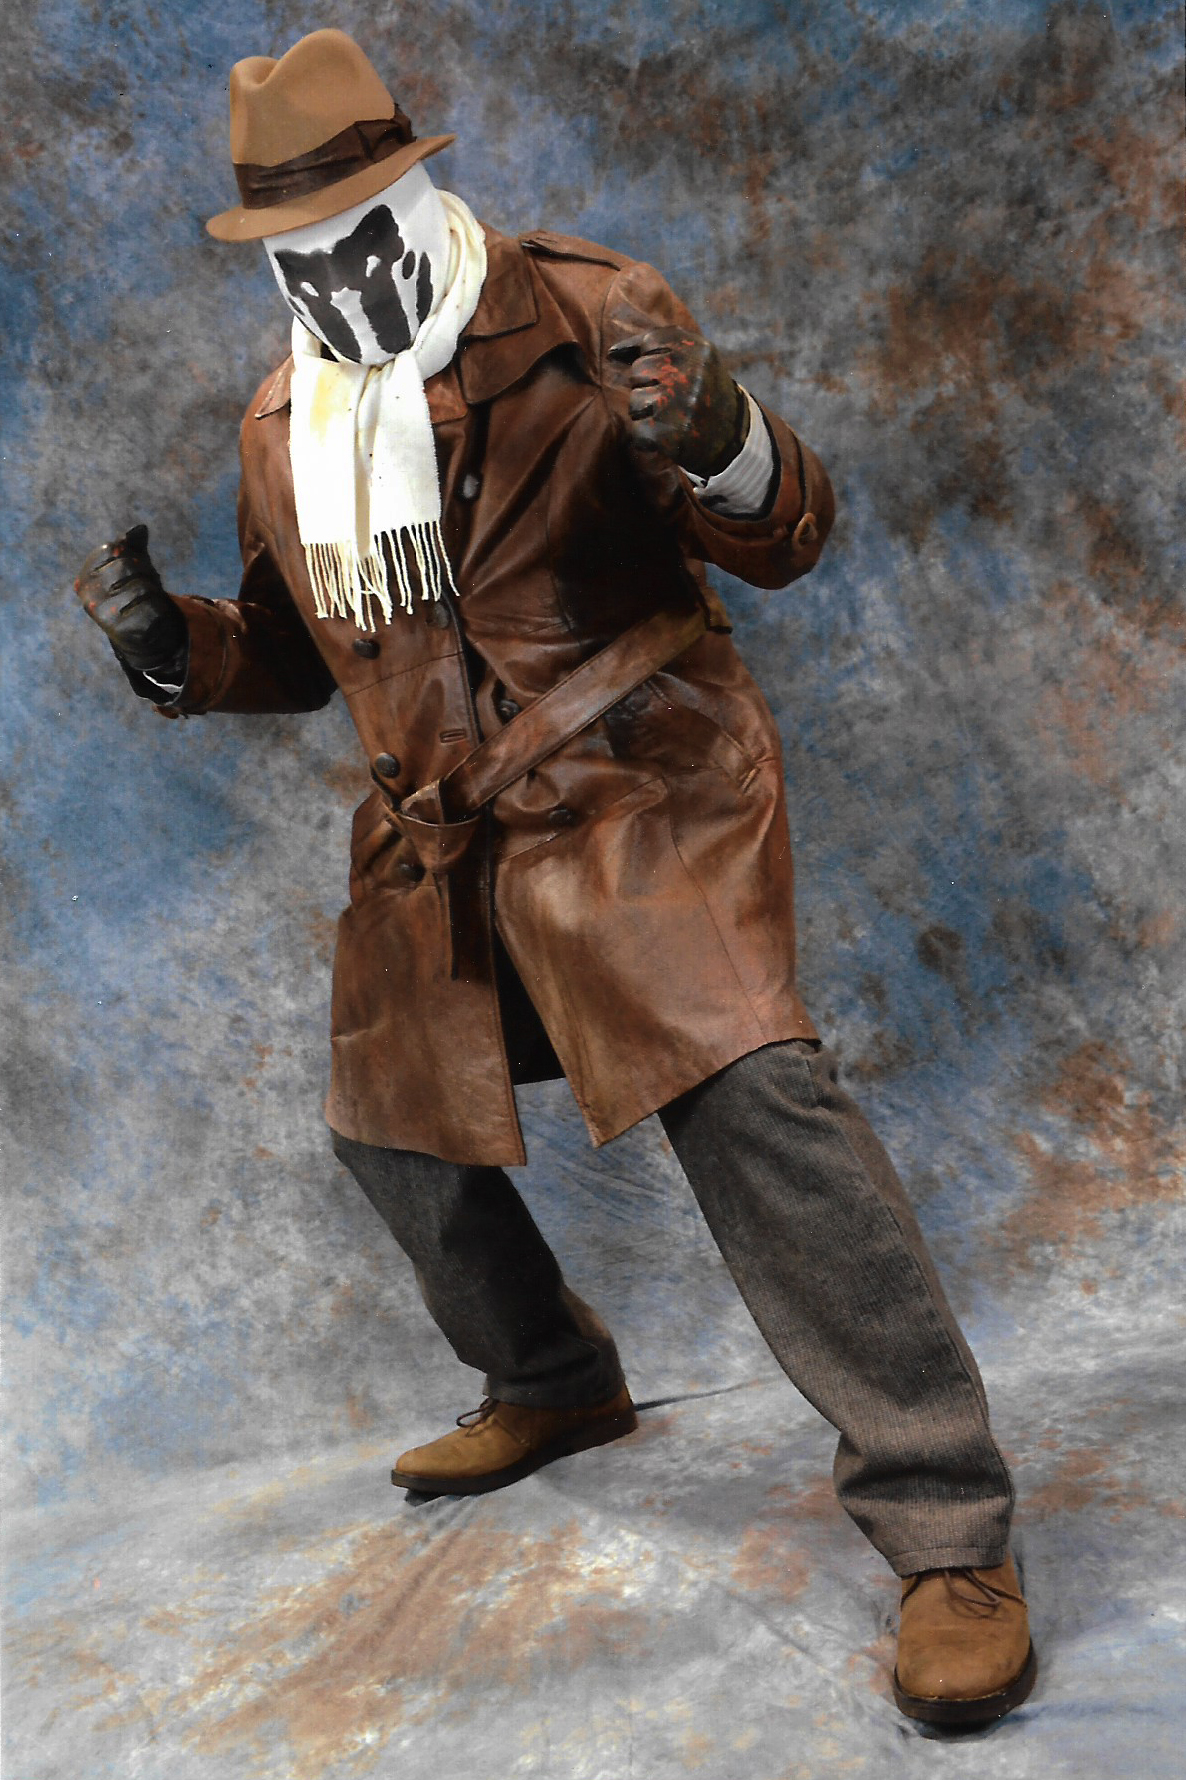
The gloves ($10.00), scarf (I bought 2- $6.25-13.00ea), and hat ($12.00) were ordered online, and then detailed with some “human bean juice” blood splatter, and the shoes were some brown suede ones I already had for casual dressing when I don’t want to wear sneakers. I’ve got some brown dress shoes that would work well, too- but these are more comfortable which is VERY important when walking around cons. The pants I got from the Unclaimed Baggage Center in Scottsboro, AL. They have a light pinstripe to them, and would work great for a steampunk cosplay, too. They’re very comfortable, and cheap! Got them for under $10 when I was shopping there for my War Doctor costume.
The shirt came from Goodwill, as did a paisley tie ($1.00 or so) I wear under the scarf in case it’s a bit too hot to wrap up. It makes the costume look a bit more like the Rorschach from the “Before Watchmen” comic. (Mmm…helped myself to some beans. Hurm…)

Here are the Rorschach pants and War Doctor pants and a shirt I liked at the Unclaimed Baggage Center store. Going to use that shirt for a possible western or steampunk costume. It was too cool and too cheap to pass up.
I found a few other shirts I liked at Goodwill for around $4.00-5.00ea and ended up using the far left one for both the War Doctor and Rorschach. I need to shorten the sleeves just a bit one of these days, but under the jacket it’s not too noticeable. The thing to remember about Goodwill, Unclaimed Baggage Center, Army Surplus, fabric shops, and thrift stores is you have to shop them often, keep a good eye out, and hope you get lucky.
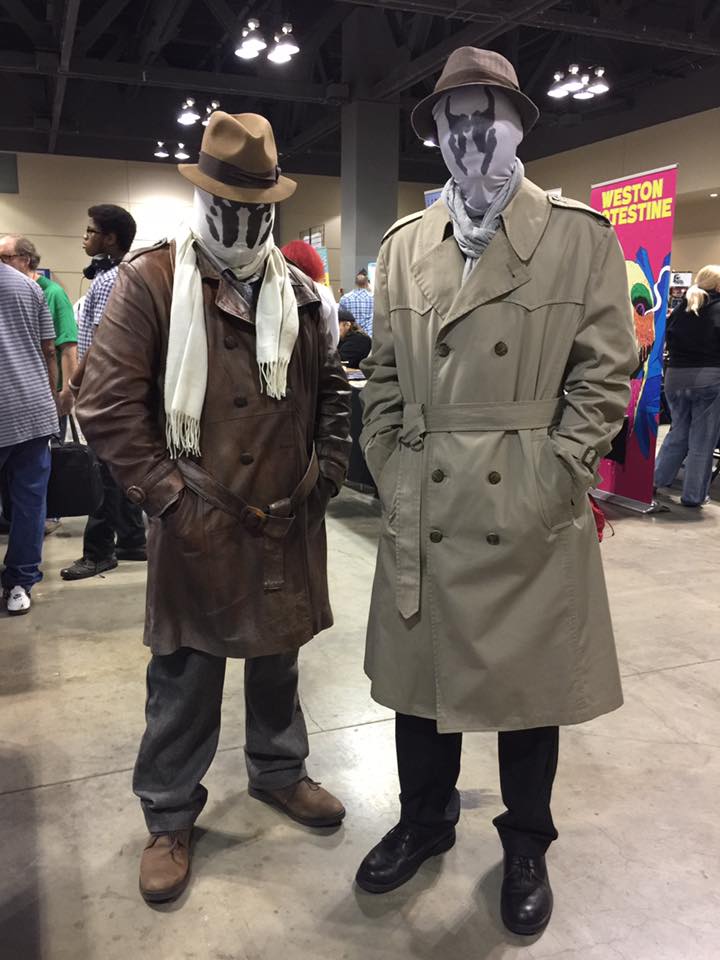
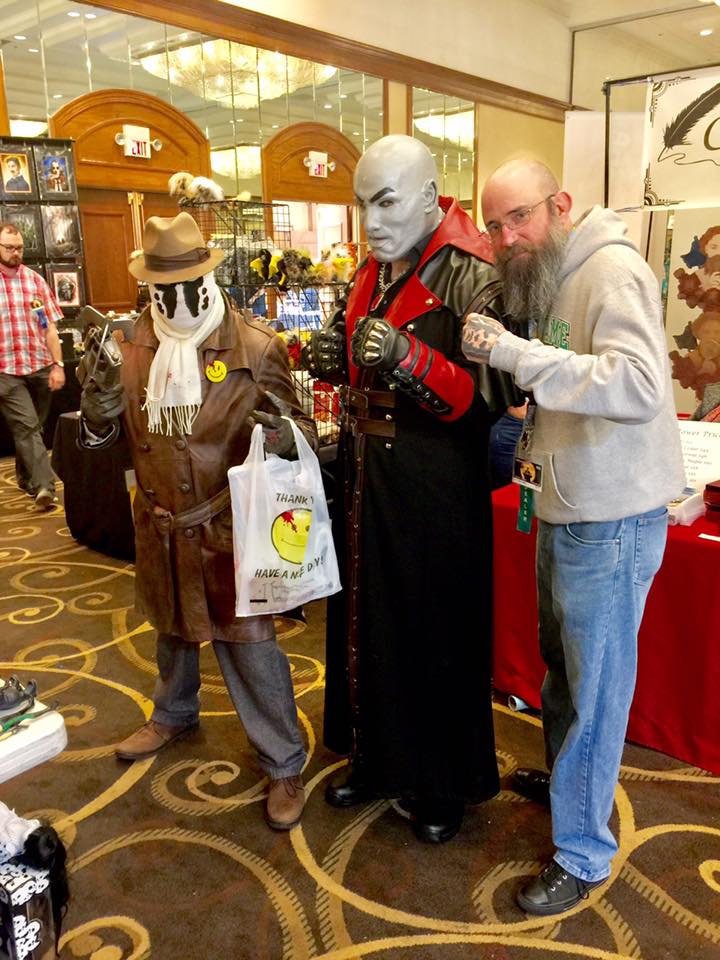
Now, anyone could get a trench-coat, a hat, and mask and be Rorschach fairly cheap, and I occasionally see another one at a con from time to time (that’s me in the left photo at Comic Cellar and on the left at MCX2016)- but not as often as you might a Harley Quinn or Deadpool these days. It’s an iconic costume, but one that you can put your own spin on and easily put together or buy online. In fact, my whole Rorschach costume was put together for a little over $100.00 or so if you include the cost of stuff I already had like the shoes and jacket.
“Closet Cosplaying” with items you can find in your own closet or from thrift stores is my favorite way to costume. It can be more realistic- not only in looks, but in budget, time, and ease. Being able to buy off the rack and maybe do a bit of modification with my level of basic sewing, fabrication, and make-up skills makes it more fun for me and not as stressful as creating totally from scratch. I hope to be able to do more from scratch as my costuming abilities improve, but part of me will always dig the scavenger hunt style of costuming.
Okay, so I’ve put my spin on the Rorschach character, but what is the one thing truly missing from this cosplay..?
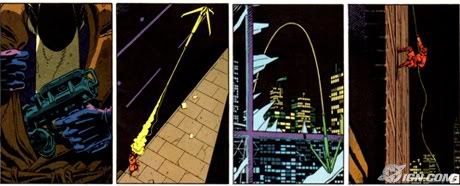
A Rorschach grappling gun! It varies some from the comic to the movie, and is very similar to the one in the ’89 Batman film.
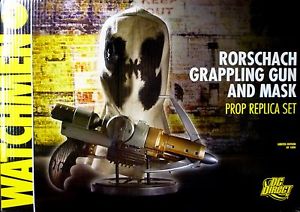
Now, they sell an official replica gun and mask for a few hundred dollars, and I’ve seen some other working guns for for twice that. I didn’t have that kind of cash lying around. My cheap solution…
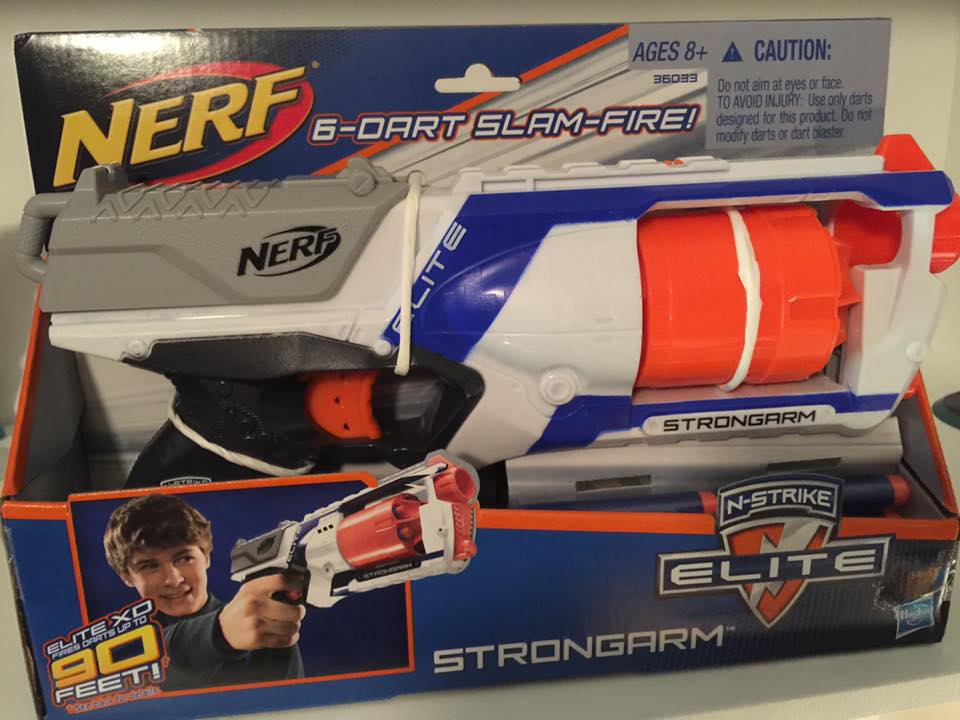
…a $12.00 Nerf gun from Walmart. That kind of change I had on me, and didn’t mind spending some time creating a gun myself. Nerf guns are great for customizing, and some of the off-brand ones are even better…and cheaper. 😉
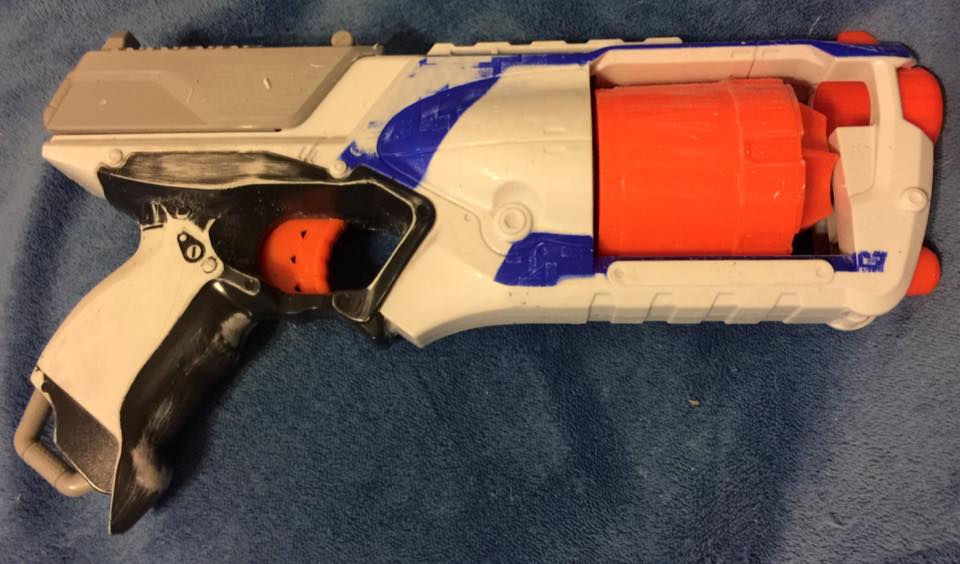
The first thing I did after taking it out of it’s packaging (and doing a few Nerf test shots in the living room) was sand off all the raised writing and logos on the surface. I also lightly sanded the entire gun to help the primer and paint stick better. It was a bit slick and shiny.
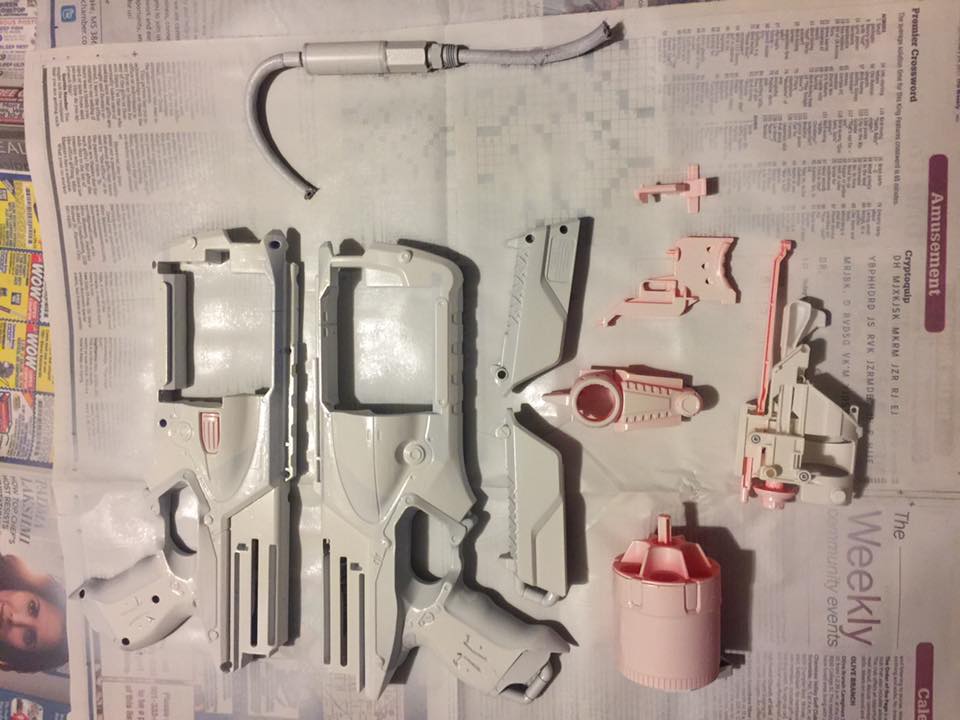
Then I took the gun apart, put some newspaper down on a table in the garage, and sprayed all the parts I needed with a primer. I had an old busted airbrush hose and moisture trap plus some fittings that I sprayed with primer, too. It took about a day or two of spraying and drying to get a good even coverage on all the parts.
Then I used blue painters tape to mask off areas for the metallic spray paints. I used a little bit of black spray paint to create some light shadows to help give the piece some depth and not look so fake. I figured Rorschach probably got his gun from Nite Owl back when they were partners, but he doesn’t keep it in pristine condition these days.

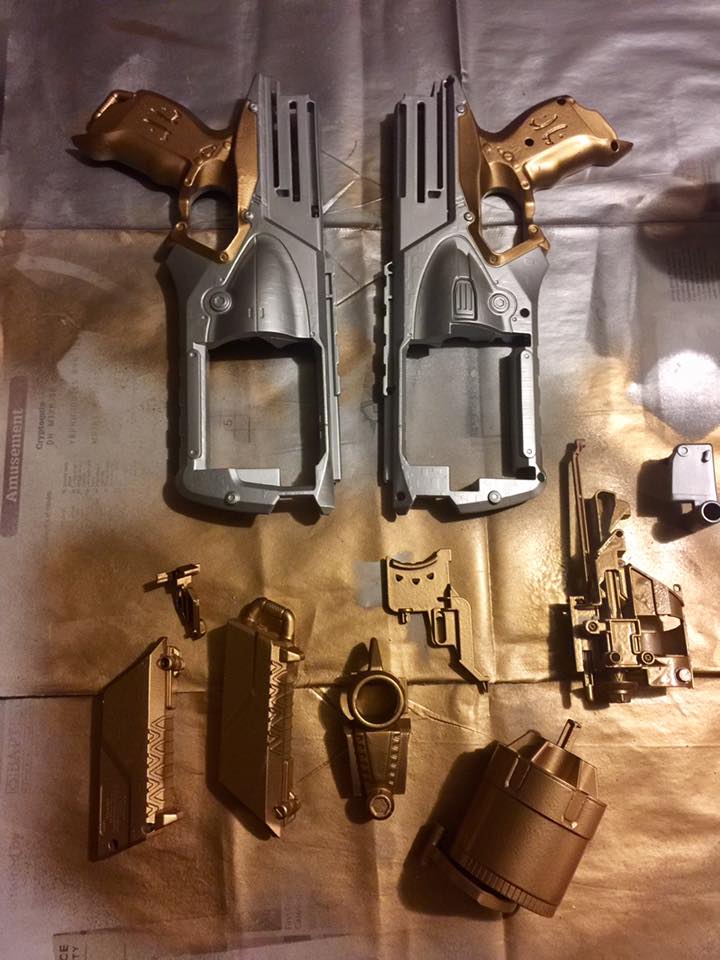
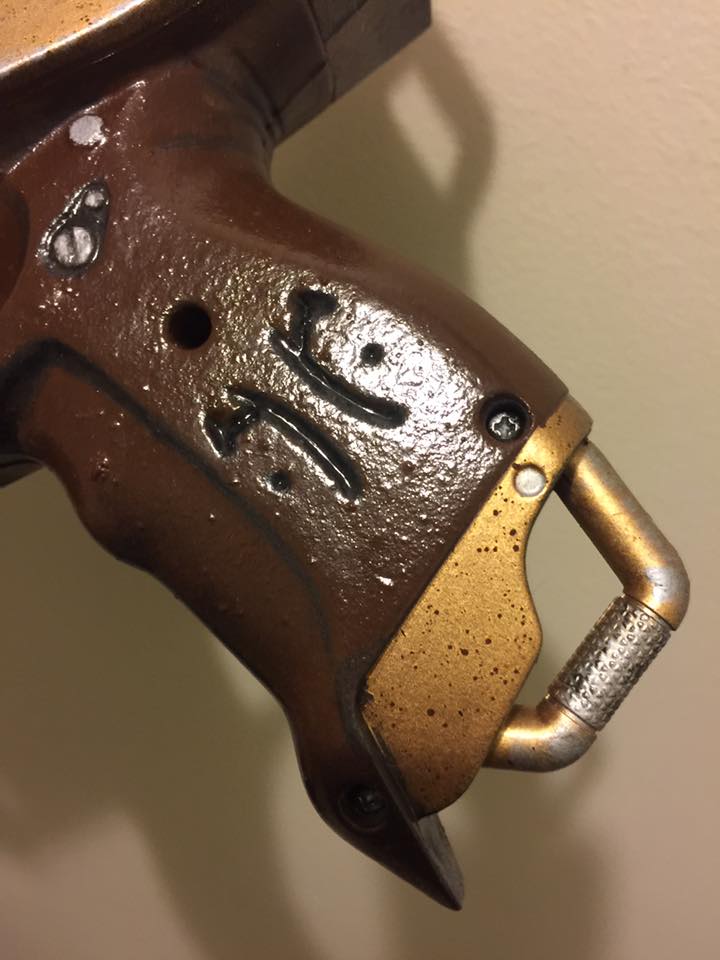
To give it that look I did some detailing with a small brush, some dry-brushing with a wider brush, and used some wood stain to age it. It’s amazing what a little bit of dry-brushing, washes, or other paint tricks can make a prop pop! Before disassembling it I used a Dremel to carve his logo into both sides of the gun’s handle and painted the recessed areas black.
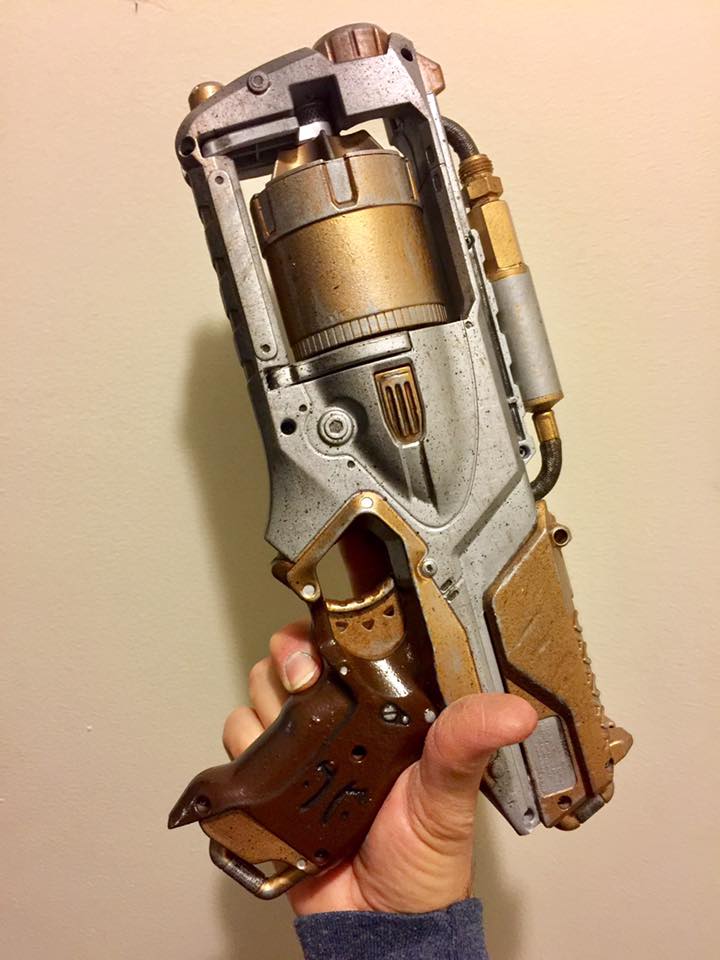
I took out the firing mechanism and glued the rotating ammo cylinder and cocking slide on top in place. The trigger can still be pulled, but nothing happens- just makes holding it with gloves on easier. I added the old air-hose/moisture trap assembly to the top of the gun to simulate an air cylinder. Once the gun had been reassembled and all the painting was done I sprayed the gun with clear to protect it from unwanted scratches at cons. It’s okay to look like it has scratches and wear, but don’t want the paint to actually come off. I used a gloss clear on the handle and a matte finish spray on the rest of the gun. I usually have plenty of clear and other spray-paint on hand. It’s pretty cheap and can be used on lots of things for protection or effects.
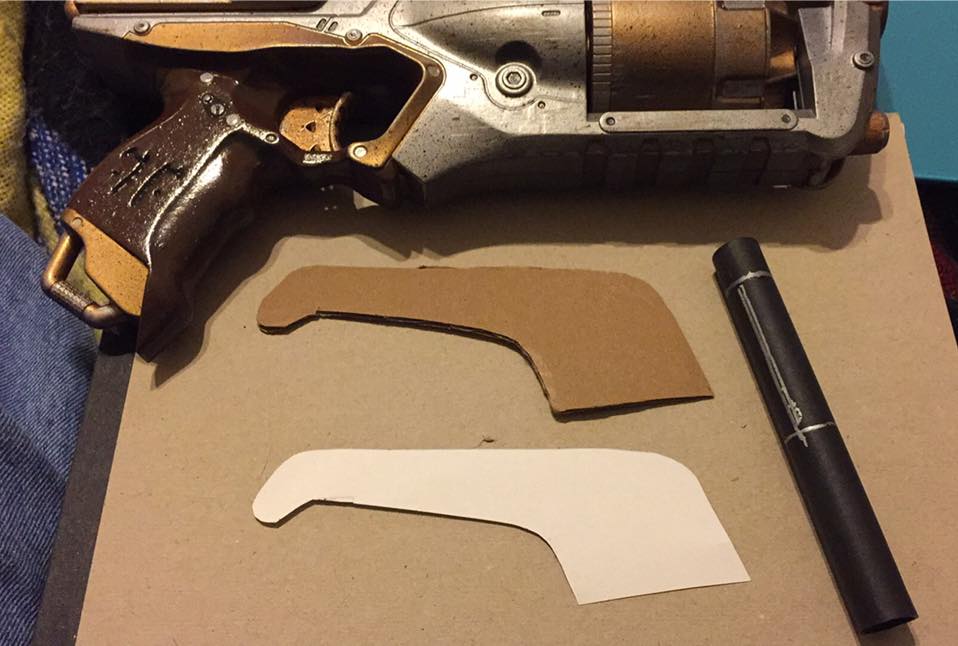
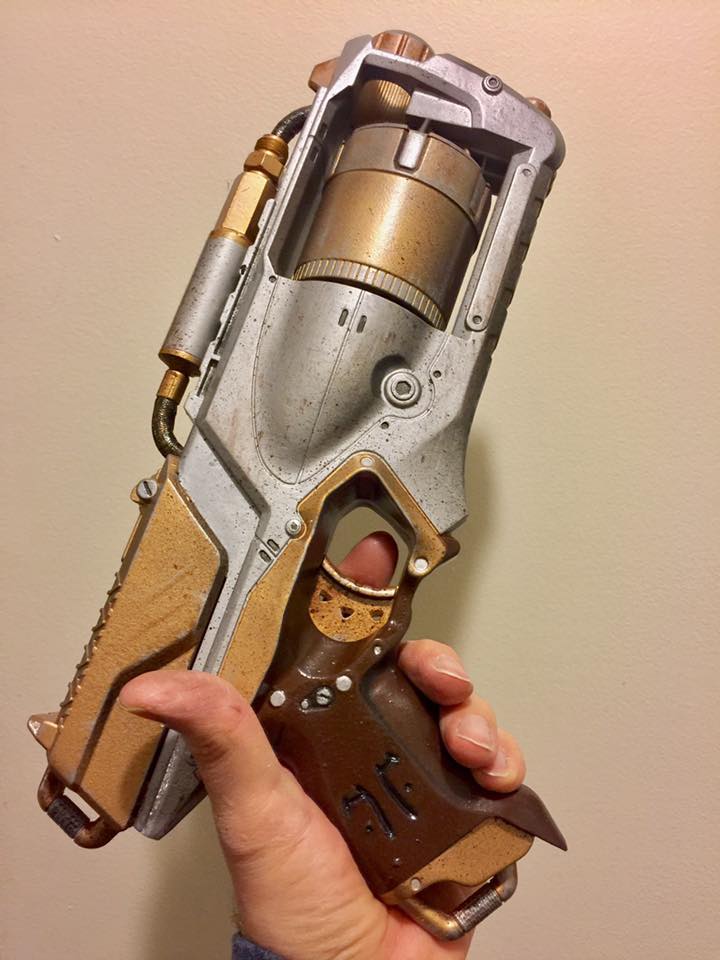
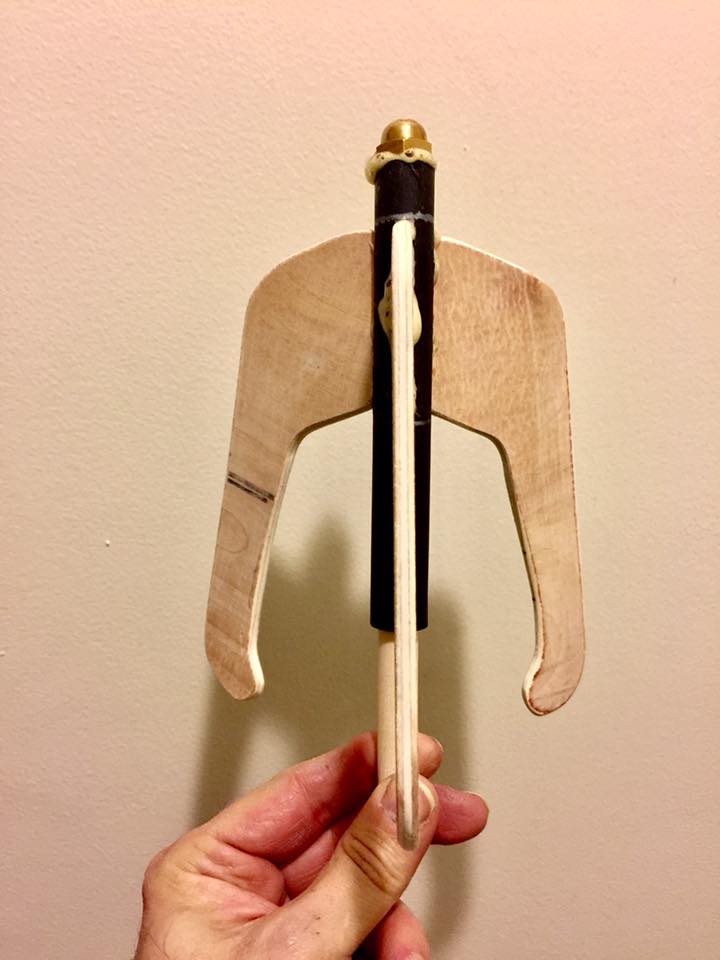
Finally it came time to make the hook- the part I really wasn’t so sure about. I drew a paper pattern first to check size and shape with the assembled gun. It took a couple tries to get the look and size right. I then made a sturdier cardboard template. I had kept a broken tube from one of my old solar powered yard lights and used it and a wooden dowel as the main shaft of the hook. I used Gorilla Glue to fasten the two pieces of the shaft together after measuring and cutting the spaces for the three hook prongs with an X-acto knife and my Dremel.
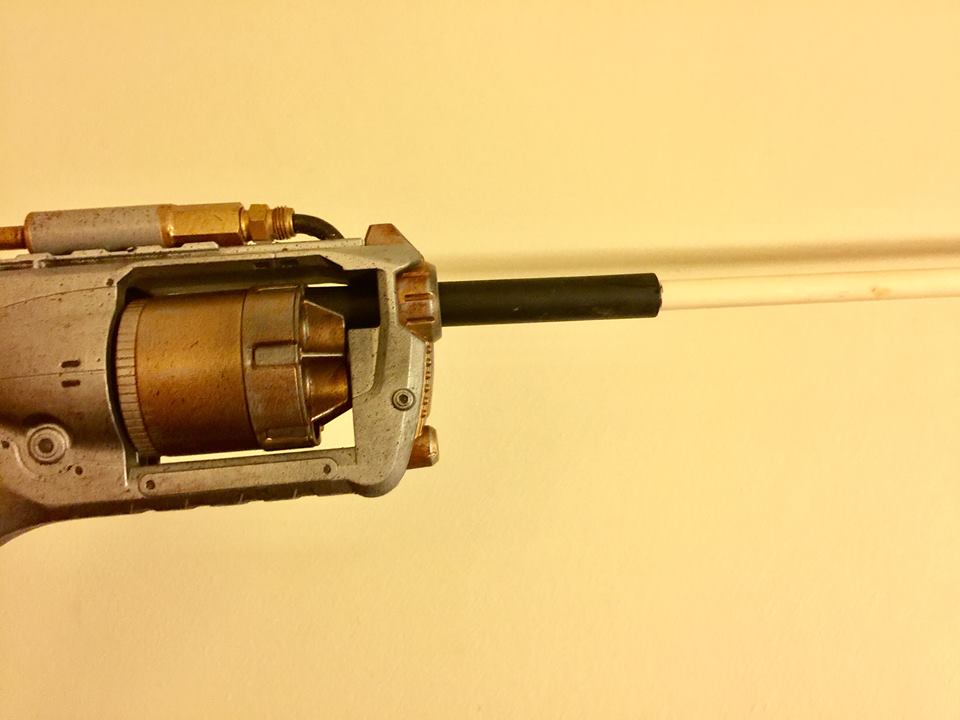
The plastic tube fit perfectly in the barrel, and the wooden dowel fit snugly into the ammo cylinder. It all fit so snugly I didn’t need to use magnets or anything to keep it in the gun, and the hook would pull out easily if needed.
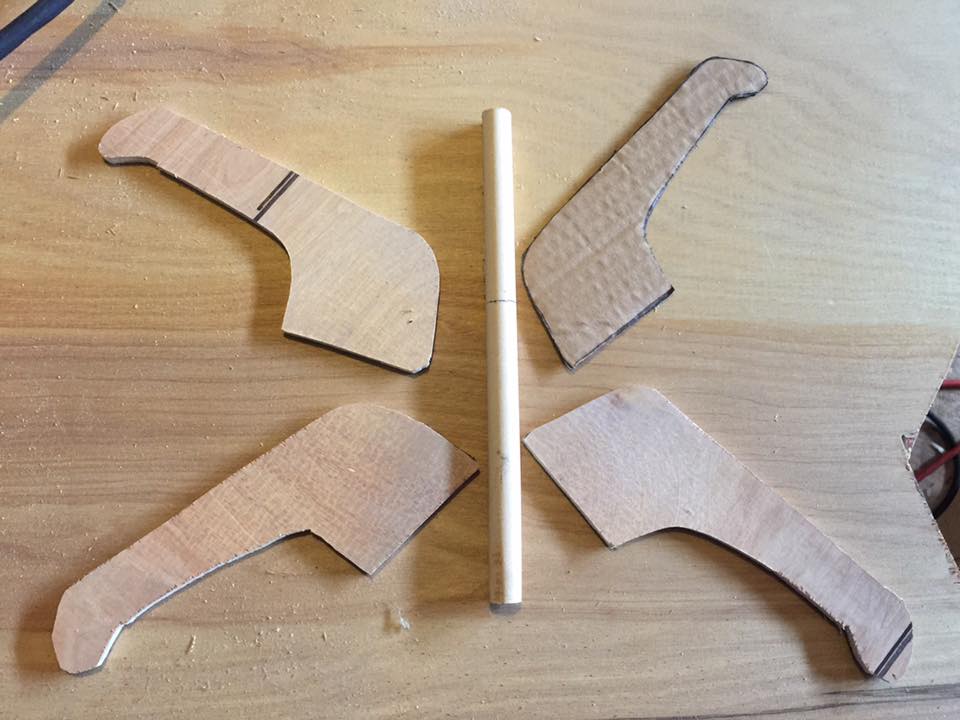
Using my cardboard pattern I drew the shape out on some thin scrap plywood I had left over from some shelving projects (waste not..!). I cut the three hook blades out with a jigsaw.
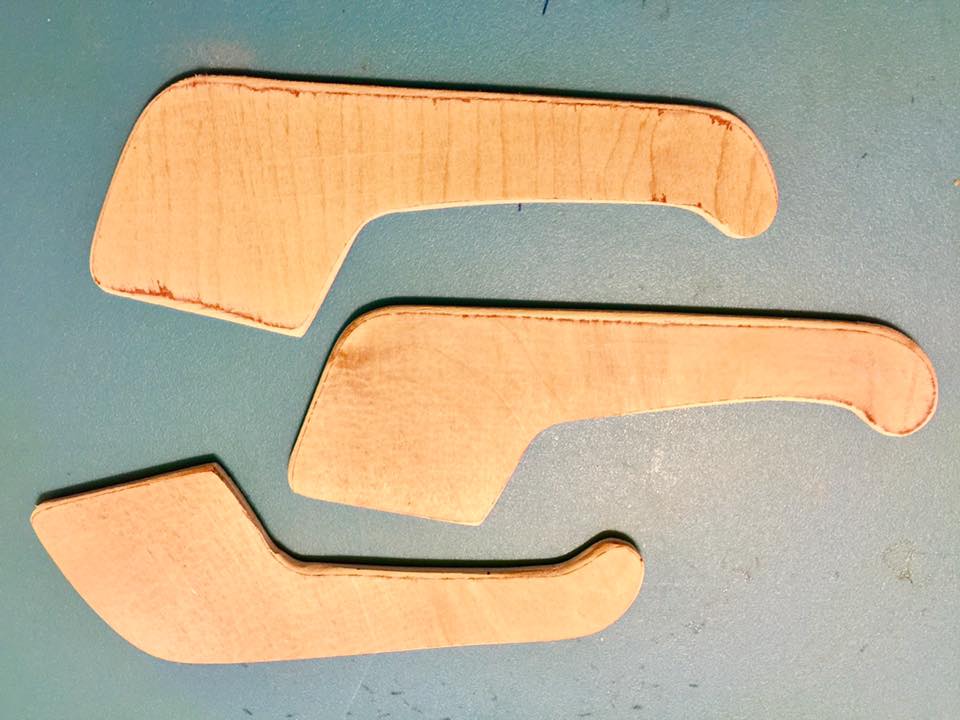
The wood was light but sturdy. I did rounded corners for safety at cons (I have limited sight while wearing the mask, especially in a crowded and dark con). I sanded the pieces smooth with an electric palm sander and a bit by hand.
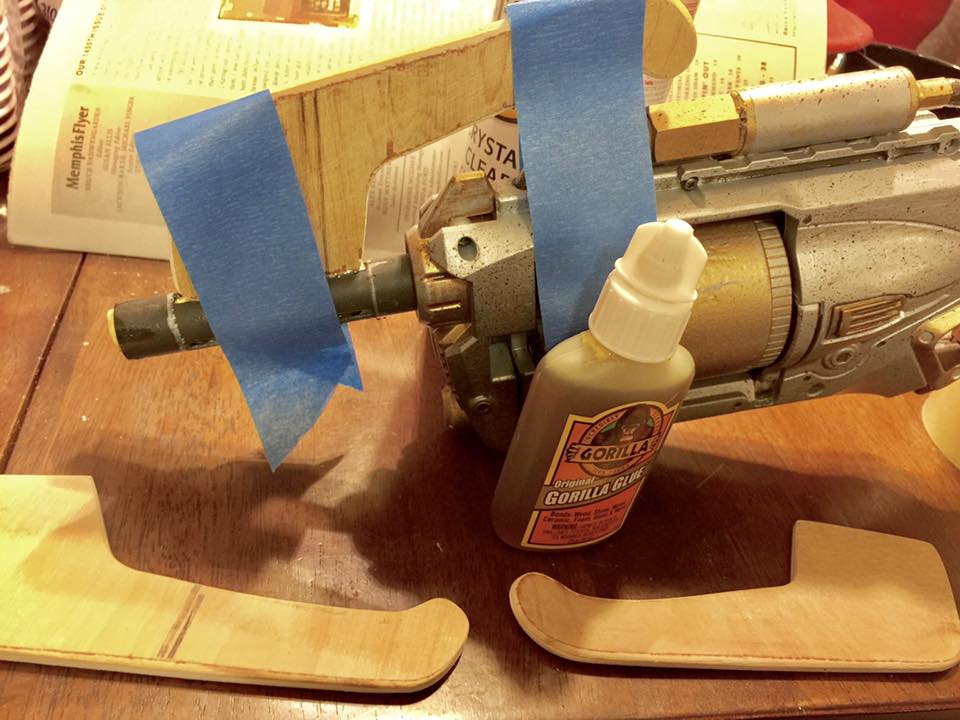
I then glued them on one at a time with Gorilla Glue and the blue painters tape. I let each side set up overnight. The glue held so well that when my cat Lex knocked it off my costume tote and onto our hardwood floors it bounced! Didn’t mean to do a stress test on it but glad to know it’s durable enough to pass one.
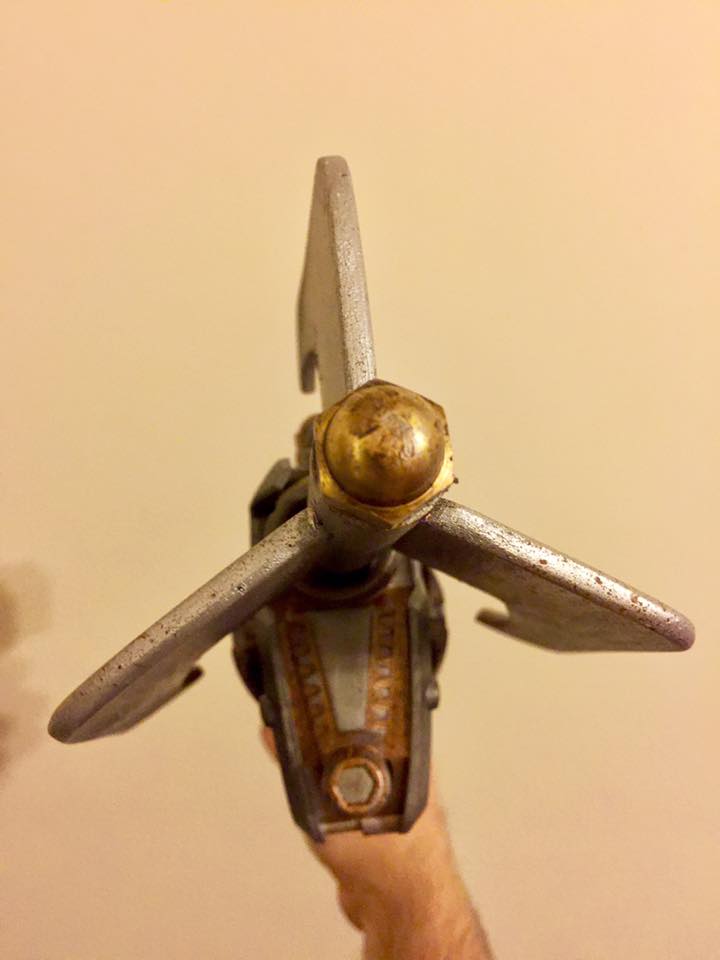
Once the fins were secure I glued a brass fitting to the tip of the hook. I picked up 2 sizes at a local hardware store for under a buck each and ended up suing the larger of the two. I then cleaned up some of the excess glue, primed it, spray-painted and aged it like I had the gun. It was hard not to rush it all, but I think taking my time really paid off.
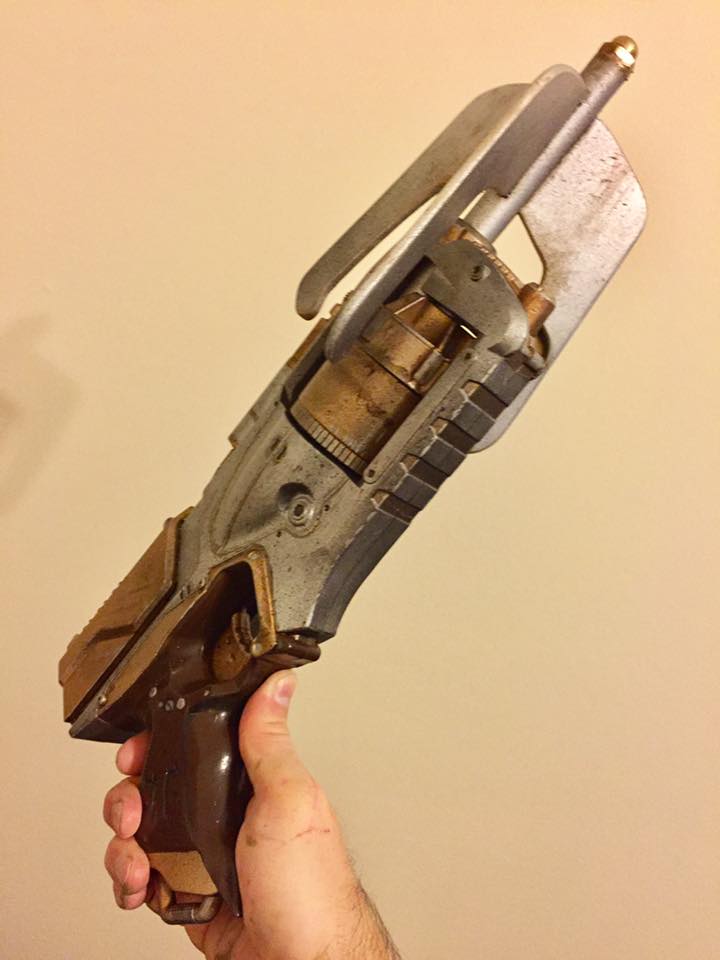
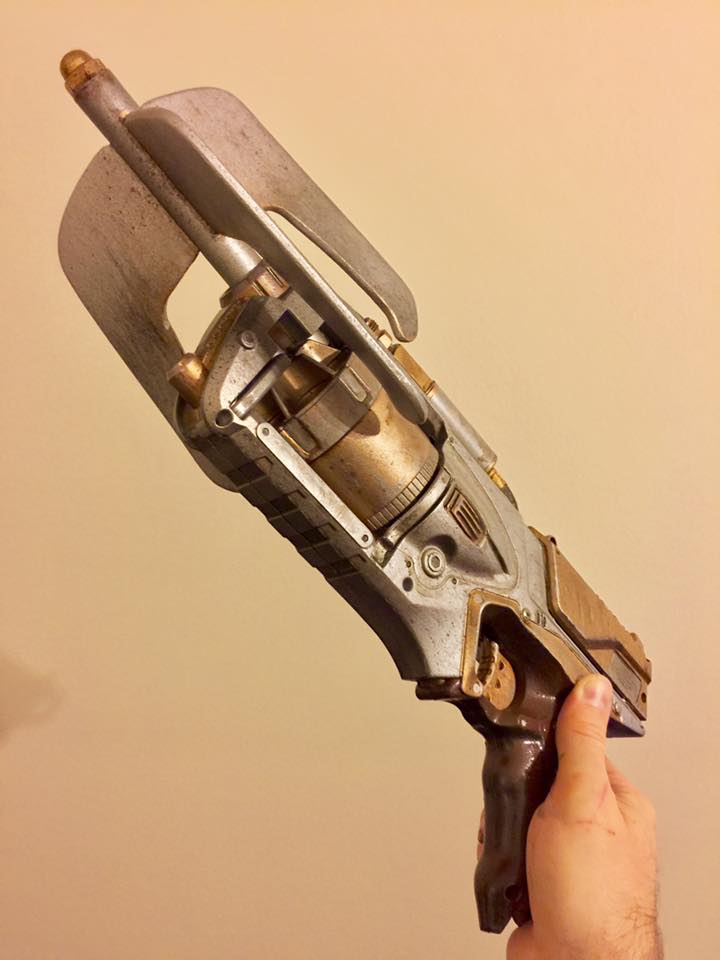
And there you have it- a finished grappling gun for under $20.00. Okay, so it doesn’t fire or open, but that could be problematic at cons if it did and would probably be banned from entering the cons. I just needed a lightweight and cheap photo prop, and this more than does the job- and didn’t kill my wallet.

One day I may try and create one that the fin hooks open, but that’s a project for on down the road. For now this one gets the job done just fine- and was within my limited costuming budget!
I’ve had a lot of fun making this costume, and have had a blast getting to wear it to cons. It can be a bit warm at times, but is actually pretty comfortable and can be re-purposed into other costumes, which makes things easy if I want to cosplay at an away con. I am looking forward to doing some original fan art based on it soon, and will share that on my LinWorkman.com site when finished. You can also check out some of my other costumes and some others at cons I’ve attended on this site’s blog entries- “Confessions of a Closet Cosplayer“, “Cosplaying in Memphis- photos from MidSouthCon 34“, and “This Means War”- My Doctor Who War Doctor cosplay Part 1“.
Hope to see you all at a con this season!
Lin/Rorschach
(Additional photos by Nicki Workman Photography/@NWorkmanPhoto, Toy Robot Photography, Pense Productions, Memphis Comic and Fantasy Convention promo booth, Marcy Meeker, and Dale Martin.)
All DC Comics characters and the distinctive likeness(es) thereof are Trademarks & Copyright © 1986 DC Comics, Inc. ALL RIGHTS RESERVED.
Comments are closed.